4.6 Scanning documents
You can scan documents from the Application tab of the PIV applicant editing screens. You can use scanners that support WIA, or, if you have the MyID TWAIN module installed, scanners that support the TWAIN protocol. For information on acquiring the MyID TWAIN module, contact your account manager.
You can also upload image files instead of using a scanner.
4.6.1 Scanning images
To scan an image:
-
On the Application tab of the PIV applicant editing screens, click the scan icon for the document you want to scan:

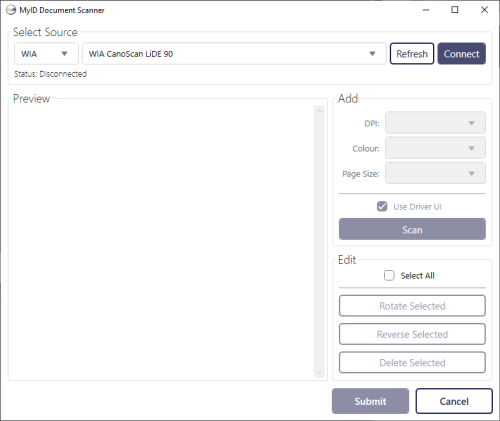
The MyID Document Scanner window appears.
-
From the Select Source drop-down list, select the source:
-
WIA – select this option to use Windows Image Acquisition (WIA) to scan images.
-
TWAIN – select this option to use TWAIN-compliant scanners. This option allows you more control over the image scanning process, depending on the TWAIN driver for your scanner. You must have the MyID TWAIN module installed to select this option.
Note: The MyID Document Scanner supports only 32-bit TWAIN data sources.
-
File – select this option to upload an existing scanned image file from your PC; see section 4.6.2, Uploading image files.
Note: The MyID Document Scanner remembers the last setting you selected for the source.
-
-
From the drop-down list, select the scanner attached to your PC.
If your scanner is not listed, you can click Refresh to update the list of scanners.
-
Click Connect to connect to the scanner.
If the scanner is not connected, an error is displayed.
-
For TWAIN scanners, you can set the following options:
-
DPI – the resolution at which the scan is made.
The MyID Document Scanner restricts the options in this list to 150, 200, or 300 – if you use the driver UI, you can override this to any DPI setting supported by the driver. You are recommended to scan documents at 150 DPI, as this provides sufficient quality without creating excessively large files.
-
Color – whether the scan is RGB (full color), black and white, or gray scale.
-
Page Size – the size of the document being scanned.
Alternatively, you can select the Use Driver UI option to use the scanning dialog provided by the driver; this gives you more control over the scanning process. For information on this scanning dialog, see the documentation provided with your scanner.
-
-
Click Scan.
-
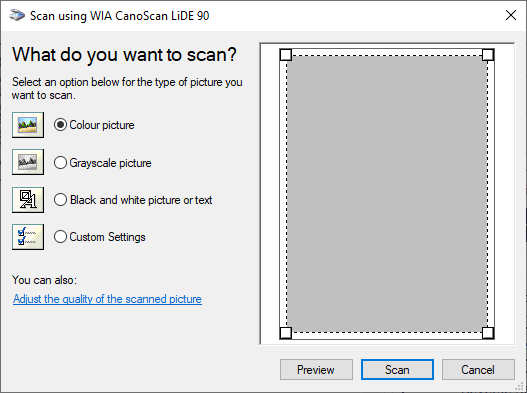
For WIA scanners:
The standard Windows dialog appears:

Select the options, then click Scan.
-
For TWAIN scanners:
-
If you are using the driver UI, the scanning dialog provided by your TWAIN scanner driver appears. Follow the onscreen instructions.
-
If you are using the MyID settings, the document is scanned and appears in the Preview pane.
-
-
-
If required, you can scan multiple pages.
Multiple pages for a single document are stitched together into a single image when you import them into the person's record in MyID.
-
Once you have scanned the pages you want to import, you can carry out the following:
-
Re-order the pages – click and drag the pages to change the order.
-
Delete a page – click the delete icon on the page preview.
-
Rotate a page – click the rotate icon on the page preview.
-
Carry out multiple actions at once – use the select boxes on the page previews, then click Delete Selected or Rotate Selected. To select all of the images, click Select All.
-
Reverse the order of the selected pages – use the select boxes to select the pages for which you want to reverse the order, then click Reverse Selected.
-
-
When you are happy with the scanned images, click Submit.
The images are imported into the PIV applicant editing screen, and are saved to the person's record when you click Save. The Capture Date (for identity documents) is set automatically.

4.6.2 Uploading image files
To upload an image:
-
On the Application tab of the PIV applicant editing screens, click the scan icon for the document you want to upload:
The MyID Document Scanner window appears.
-
From the Select Source drop-down list, select File.

-
Click Open File(s).
-
Select one or more image files.
You can use CTRL or SHIFT and click to select more than one image, or you can use the Open File(s) button multiple times; images are added to the Preview pane. Multiple pages for a single document are stitched together into a single image when you import them into the person's record in MyID.
-
Once you have uploaded the pages you want to import, you can carry out the following:
-
Re-order the pages – click and drag the pages to change the order.
-
Delete a page – click the delete icon on the page preview.
-
Rotate a page – click the rotate icon on the page preview.
-
Carry out multiple actions at once – use the select boxes on the page previews, then click Delete Selected or Rotate Selected. To select all of the images, click Select All.
-
Reverse the order of the selected pages – use the select boxes to select the pages for which you want to reverse the order, then click Reverse Selected.
-
-
When you are happy with the uploaded images, click Submit.
The images are imported into the PIV applicant editing screen, and are saved to the person's record when you click Save. Note that the Capture Date (for identity documents) is set automatically to the date of upload, not the timestamp on the file.

4.6.3 Tested scanners
This release has been tested with a variety of WIA and TWAIN compliant scanners.
For TWAIN support, you require the MyID TWAIN module installed; this module uses version 2.4.3 of the TWAIN DSM, which implements the TWAIN 2.4 specification. TWAIN 2.4 is backwardly compatible with scanners that use older standards.
Note: MyID uses the 32-bit version of the TWAIN DSM. Any scanner that provides only a 64-bit data source will not work.
If you have any questions about support for specific scanners, contact your account manager.